Git Process for Publishers
In this scenario, an exercise is presented that will help pull together the concepts discussed previously and allow for hands-on practice. This project will be most effective if a team of four is formed. For the purposes of this exercise, you will need to refer to previous documentation, for greater detail specific to github commands.
Although there is strong support for non-linear development within Git (through rapid branching and merging), this project follows a rather straightforward publishing process with a managing editor controlling the various stages of editorial development.
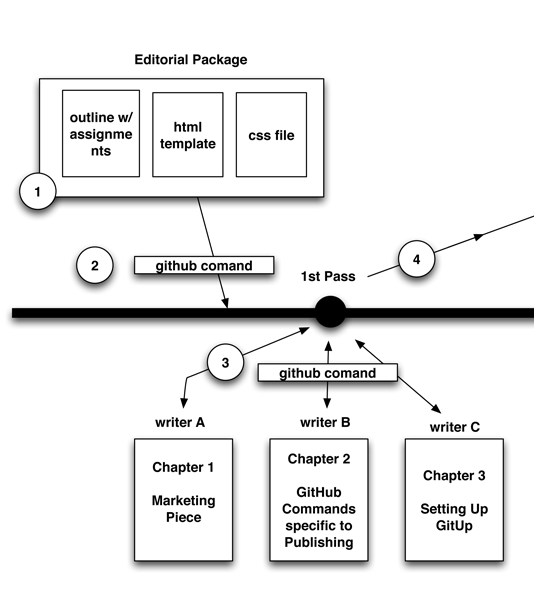
Step 1. The scenario involves a linear publishing process whereby a team of four individuals are working independently to create an XHTML tagged text file that any writer could download and start writing within. A CSS template file also needs to be created so that none of the writers worry about the formatting of their content.
A managing editor will oversee the entire process, but will rely on the three writers to create the content and load into the Git repository within Github. The editor will then pull the content down once he/she approves of the version for others to access and further revise.
Three chapters need to be written by separate writers: 1) a marketing chapter with a purpose narrative on why writers should utilize the Git technology and their proposed workflow process; 2) a chapter on GitHub commands specific to the publishing industry; and, 3) a setting up Github (for the first steps in the process) which include basic navigational commands: push/pull, merge, revision history, etc.
As the chapters are written, marketing’s narrative is validated and the commands are practiced by the writers as they execute what they write. The writers and managing editor will ensure quality control is in place as they work through the process of creating this content for electronic publication.
Step 2. Each individual participating in this exercise should setup a Github account. Follow the instructions within the tutorial and access Github at http://github.com. Don’t forget to provide Git your name and email address so your future commits are associated with your name and email.
The project member selected to be the managing editor should create the Github repository. In addition to the tutorial within the documentation preceding this project, another reference is the Git Community Book: The open Git resource pulled together by the whole community, “Chapter 3: Basic Usage” for information on how to obtain a Git repository.
You can either clone a repository or initialize one. Don’t forget to review “git init” and “git clone” commands.
Step 3.Once everyone has an account and a repository is in place. Each writer should begin researching and writing their topic. An XHTML tagged text file should be used by everyone within the project to ensure common format structure.
Each writer will need to commit their changes to the repository in at least two intervals: referred to as 1st Pass and 2nd Pass in the graphic accompanying these instructions.
Writers will either add a new file or stage an existing file and then commit (“git add” versus “git commit” commands). Refer to earlier documentation for instructions on how to Stage a file for a Commit.
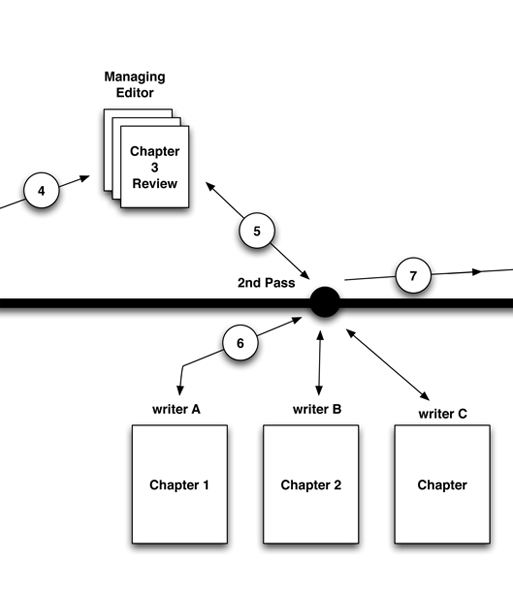
Step 4. The managing editor will also need to look out for Pull requests from each of the writers after they have Pushed changes to the fork of the project. Recall that changes are Pushed from the working repository to the master repository by the writers.
It is up to the managing editor to Pull the changes from all the writers into the master repository and review any messages accompanying these requests.
Writers may also find that they want to Push experimental content to fellow writers on an arbitrary branch in order to share content prior to making Pull requests of the managing editor. (Recall: “git pull” and “git push” commands.)
Writers: remember to type in a message with your Pull request.
Step 5. The managing editor will need to review all the files. The command “git log” will allow him or her to see the list of changes to the project.
First time Pull requests will need to be fetched with the “git remote add” command. Afterwards, the managing editor need only fetch again.
Decisions will need to be made whether to merge the changed done. Don’t forget to use the “\$ git checkout master” command.
Also, the managing editor at this stage should be opening the “index.htm” file in a web browser to view how the content is displaying. Edits to the XHTML and CSS files may need to be made at this stage to save time later.
Step 6. The chapters will now be ready for a “2nd Pass” review and revisions. Each writer will need to Fork the latest repository to their Github account.
Practice with the “git log” command to show lists of commits and thus review the history of the changes.
Each writer will repeat steps described above as they review their current chapter, along with edits made from other writers and the managing editor. The “2nd Pass” of this project involves much more than simply revising your chapter. Indeed, it involves working on your chapter along with the chapters others have submitted. Writers will continually need to Push their content and then make Pull requests of the managing editor.
Step 7 Work that is viewed as complete can be merged from the work branch onto the master.
Writers should remember to check out the branch they want to merge their changes into.
Remember, changes will also need to be merged into the master. Don’t forget to check out the master branch and then perform the merge.
Step 8. The managing editor will need to review all the files for the final time. Remember, the command “git log” will allow him or her to see the list of changes to the project. Decisions will need to be made whether to merge the changes completed: that’s why a managing editor is needed.
During the writing process, there will probably be conflicts between the writers that need to be resolved. The “git merge” and “git pull” commands continue merging content even when conflicts exist. Chapters may need to be cleaned up manually thus requiring conflict markers being removed from view.
Another option for dealing with conflicts may be to restart from the start of the chapter by undoing a merge and returning to the previous state of the branch.
These decisions will need to be made by the managing editor.
Step 9. Once all three chapters are complete and the managing editor is pleased with the work, everything can be merged. Afterwards, the managing editor should open up the index.htm file in a web browser to view the completed product as the end-users will experience the content.
Remember to use “\$ git checkout master” and “\$ git merge work” commands.
A 3-chapter electronic document, fully formatted and reviewed by multiple parties, is now available for distribution on the web.
Everything was completed online in a virtual paperless setting.